Citrix StoreFront has replaced Citrix Web Interface as the resource enumeration and aggregation tool, used to manage the delivery of desktops and applications from XenApp and XenDesktop servers. StoreFront integrates with XenApp and XenDesktop deployments, providing users with a single, self-service access point for their desktops and applications. Users can access their resources through a web browser or through the Citrix Receiver. StoreFront communicates with the Delivery Controller using XML over TCP port 80/443. Unlike Web Interface, Storefront also partakes in the authentication process.
Navigation
1. Citrix StoreFront communication process
2. Installing Citrix StoreFront 3.12
3. Generating and Installing SSL/TLS certificate on the StoreFront Server
4. Creating the first store in Citrix StoreFront 3.12
5. Adding a second StoreFront Server to the deployment
6. Configuration options in Citrix StoreFront 3.12
.
1. Citrix StoreFront communication process

1.1 User submits credentials (username and password) through either the StoreFront web page or a locally installed Citrix Receiver
1.2 StoreFront authentication service fetches the user credentials and authenticate them with a Domain Controller
1.3 Once authenticated, StoreFront forwards the credentials as part of an XML query to a Delivery Controller
1.4 The Delivery Controller contacts a Domain Controller to verify that user authorization has taken place
1.5 Delivery Controller checks which resources have been assigned to the user and notifies the StoreFront server about them through an XML response
1.6 StoreFront presents the resources to the user in form of icons (applications and desktops assigned to the user)
1.7 User clicks on a resource, to start a desktop or application session. This request is sent to a Delivery Controller through StoreFront.
1.8 The Delivery Controller assigns a VDA (application, desktop or server) to the user based on load management policies, and notifies StoreFront about it
1.9 StoreFront creates and sends an ICA file, pointing to the VDA that was assigned to the user, to the Citrix Receiver on the end user device
1.10 Citrix Receiver on the end user device initiates an ICA connection to the VDA that the Delivery Controller allocated for this session
Resource: XenDesktop Connection Process and Communication Flow
.
2. Installing Citrix StoreFront 3.12
Supported platforms you can install StoreFront 3.12 on are Windows Server versions from 2008R2 to 2016. All the servers in a multiple server deployment must run the same OS version with the same locale settings.
2.1 Launch AutoSelect.exe from the XD 7.15 LTSR ISO
2.2 On the Manage Your Delivery screen, click Start on XenDesktop

2.3 Select to install Citrix StoreFront

2.4 Accept the license agreement, click Next
2.5 Click Next

2.5 Select to automatically create the rules in the Windows Firewall, click Next

2.6 Click Install on the Summary page

2.7 Setup will first install the prerequisites (IIS), before installing StoreFront

2.8 Choose if you want to participate in Call Home or not, then click Next

2.9 Click Finish to end the setup process

.
3. Generating and Installing SSL/TLS certificate on the StoreFront Server
There are several ways to go about this. The method I’m using here is to create a CSR in IIS, submit it to an internal CA, to finally retrieve a certificate based on the web server template. This method requires that you have a CA with the Certification Authority Web Enrollment role service installed. Because the CSR created by IIS, does not include information about which certificate template to use.
For the record, in a load balanced multiple server deployment, you can choose whether you’re going to have end-to-end HTTPS communication or not. If you choose the latter, then you only need to install SSL certificate on the load balancer (NetScaler for example). If you choose the former, and you are using Netscaler to load balance the deployment, then the SSL certificate on StoreFront servers should match the StoreFront server name. While the SSL certificate on the NetScaler must match the DNS name that resolves to the load balancing VIP.
3.1 Start Internet Information Services (IIS) Manager on the StoreFront server
3.2 Select your server name, double-click Server Certificates

3.3 Click Create Certificate Request

3.4 Fill in the form (Common name is FQDN of your server), then click Next

3.5 In the Cryptographic Service Provider Properties screen, retain the default option Microsoft RSA SChannel Cryptography Provider and select a key Bit length of 2048

3.6 Specify a file name for the certificate request, click Finish

3.7 Access the Web Enrollment site of your CA by typing this URL in a web browser, https://FQDNofCA/CertSrv
3.8 Click Request a Certificate

3.9 Click advanced certificate request

3.10 Select Submit a certificate request by using the base 64-encoded CMC or PKCS #10 file, or submit a renewal request by using the base 64-encoded PKCS# 7 file

3.11 Open the request file you created in step 3.6 in Notepad, select and copy the entire content

3.12 Paste the content of the file in the Saved Request text box. Select Web Server as Certificate Template. Finally, click Submit.

3.13 Click Yes

3.14 Click Download Certificate and save the certificate in a folder.

3.15 Start Internet Information Services (IIS) Manager
3.16 Select your server name, double-click Server Certificates
3.17 Click Complete Certificate Request

3.18 Browse to the file you downloaded in step 3.14, set a friendly name to identify the certificate, and select the Personal store. Click OK

3.19 The certificate will be installed into the Personal store


3.20 Right-click Default Web Site → Edit Bindings

3.21 Click Add

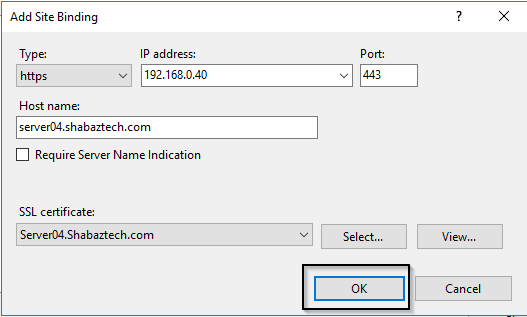
3.22 Select https as Type, select appropriate IP address, enter Host name and select the SSL certificate you just installed. Click OK when done.

3.23 Click Close

.
4. Creating the first store in Citrix StoreFront 3.12
4.1 Start the Citrix StoreFront Management Console
4.2 Click on Create a new deployment

4.3 Confirm the base URL, click next. The base URL is the URL all the stores on the StoreFront server will be placed beneath.

4.4 Click next on the getting started page

4.5 Give the store a name, select to make the Receiver for Web site created with the store the default IIS website.

4.6 On the Delivery Controllers screen, click Add*

4.7 Select XenDesktop/XenApp as Type, and add the FQDN of the delivery controllers of your site. I just left the Display Name at default (Controller), but you should really use the name of your site as the Display name.

Putting a check mark at Servers are load balanced, will have the StoreFront server contact the Delivery Controllers in a load balanced manner, based on, to my knowledge, round robin DNS technology.
Transport type: HTTPS or HTTP between StoreFront and Delivery Controllers
Port: Port Number to use
Advanced Settings lets you define various settings, such as for example when a DDC should be considered offline.

Click OK when done.
4.8 Click Next

4.9 Click Next, as we’ll not configure Remote Access for now

4.10 Click Next

4.11 Click Create

4.12 Click Finish

.
5. Adding a second StoreFront Server to the deployment
5.1 Install StoreFront on the second server
5.2 Create the SSL/TLS certificate, and bind it to the Default Web Site
5.3 Start StoreFront management console on the first server
5.4 Right-click Server Group → Add Server

5.5 Copy the Authorization code

5.6 Start StoreFront management console on the second server
5.7 Click Join existing server group

5.8 Enter the name of the first StoreFront server as Authorizing server, and enter the Authorization code. Click Join.

5.9 The second server will be joined to the server group, and become part of a multiple server deployment

5.10 Similar message will be displayed on the first StoreFront server

5.11 You should take heed of this message

5.12 If you make changes on one StoreFront server, you must manually propagate those changes to the other StoreFront server, by right-clicking Server Group → Propagate Changes

5.13 The Change Base URL, lets you modify the base url for services hosted on the StoreFront deployment. As it states, for multiple server deployments, the load-balanced URL (through for example Citrix Netscaler) must be specified


.
6. Configuration options in Citrix StoreFront 3.12
This will not be a deep dive into the configuration settings of StoreFront 3.12, as that would require a separate blog post of its own, but rather just a quick look at some of the configuration settings that exist in StoreFront 3.12
6.1 If you right-click Stores, you get a few options. For now we’ll just discuss two of them

Manage Beacons
Citrix Receiver uses Beacons to determine its location (local or public network) and connection method based on that location. By default, StoreFront uses the server URL or load-balanced URL of your deployment as the internal beacon point, while the Citrix website and the virtual server URL of the first NetScaler Gateway deployment you add are used as external beacon points by default. You can change this default configuration by using the Manage Beacons option.

Set Default Website
This lets you define which Receiver for Web site the web browser will connect to when someone types only the Base URL.

6.2 If you right-click a particular store, you get several options. Let’s review a few of them.

Manage Delivery Controllers
This was covered in step 4.7
Manage Authentication Methods
Various Authentication methods can be enabled/disabled here. Lets just review the topmost method, (explicit) User name and password.
• Configure Trusted Domains
Configure if users can log on from any domain, or from specified domains only.

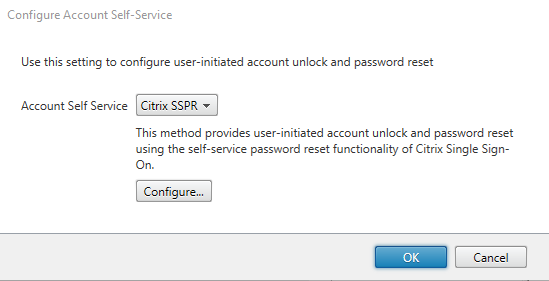
• Configure Account Self-Service
Configure user-initiated account unlock and password reset


• Manage Password Options
The settings are self-explanatory. You must allow users to change password at any time, for the Enable password reset setting of the Configure Citrix SSPR dialog box to become available.

• Manage Password Validation
Should the StorFront server get users authenticated with Active Directory Domain Controllers, or should it delegate that responsibility to Delivery Controllers? The latter is of course how authentication occured when using Citrix Web Interface.
When StoreFront is not in the same domain as XenApp or XenDesktop, and it is not possible to put Active Directory trusts in place, you can validate passwords via Delivery Controllers to authenticate users.

Manage Receiver for Web Sites
You can add Receiver for Web Sites here, or you can configure existing ones.

If you click Configure, you get to make several configuration changes, such as for example,
• Receiver Experience
Select which lay out you want to use for the site, and enable/disable advanced features such as site customization and featured app group management.

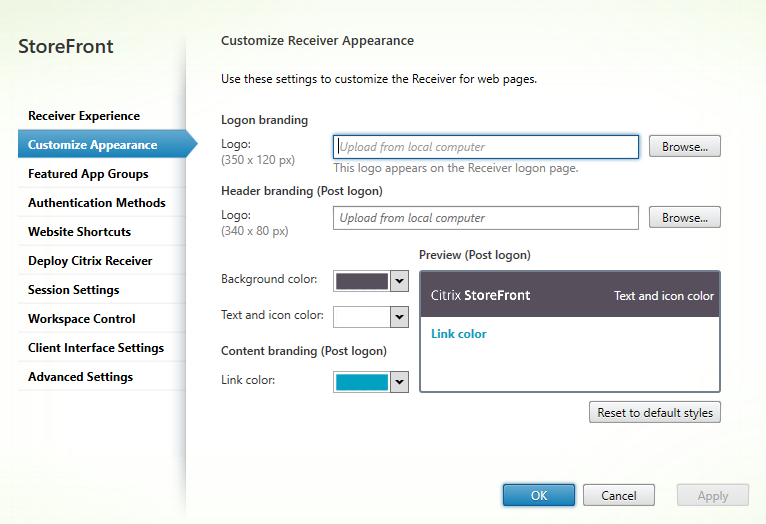
• Customize Apperance
Customize the appearence of the site

• Deploy Citrix Receiver
Deploy the Citrix Receiver to clients. You can also select the source for the installation files.

Congfigure Store Settings
You get to make several configuration changes, such as for example,
• User Subscriptions

• Kerberos Delegation
