In this blog post we will look at managing storage with Veritas Storage Foundation for Windows. This is part 1, in a series of posts about managing storage with Veritas SFW. In this part, we will look at the different types of disks and volumes you can create and configure with Veritas SFW. We will look into the purpose of Dynamic Disk Groups, and we will also look at how to bring newly added disks online, and write signature on them. The procedures for managing storage with Veritas Storage Foundation for Windows are the same in VSFW 6.01 (2008 R2) and VSFW 6.02 (2012).
If you need to know how to install Symantec Veritas Storage Foundation for Windows, you can check out the previous entries on how to perform the installation, on Server 2008R2 or Server 2012.
Managing storage with Veritas Storage Foundation for Windows
1. Dynamic Disks/Volumes
There are several advantages of utilizing dynamic volumes
1.1 Can span across multiple disks.
1.2 Which means that you can improve read and write data operations, because more than one disk will perform the operations.
1.3 Can use RAID technology to make volumes fault tolerant.
1.4 All dynamic volumes formatted with the NTFS file system, can be extended online.
1.5 Disk configuration information is contained on the disk, not in the registry. This is also replicated across all Dynamic disks in a Dynamic Disk Group, so that the failure of one disk does not obstruct access to data on other disks.
1.6 Dynamic disks provide volume migration, which is the ability to move a disk or disks containing a volume or volumes from one system to another system without loss of data.
2. Veritas SFW’s RAID Levels
2.1 Concatenated
- Concatenates n disks as one large virtual disk with a capacity of n disks.
- Data fills up the first disk before it is written to the second disk.
- Not fault tolerant. When a disk fails, the large virtual disk fails.
- No performance gain.
2.2 RAID level 0 (Striping)
- Groups n disks as one large virtual disk with a capacity of n disks.
- Data is stored to the disks alternately.
- Not fault tolerant. When a disk fails, the large virtual disk fails.
- Better read and write performance than both simple volumes and all other RAID levels.
2.3 RAID level 1 (Mirroring)
- Groups two or more disks as one virtual disk with the capacity of a single disk.
- Data is replicated on each disk, providing data redundancy.
- When a disk fails, the virtual disk still works. The data is read from the surviving disk(s).
- Better read performance, but slightly slower write performance.
- Because data is duplicated on two or more disks, RAID-1 is more “expensive” in terms of disk space.
2.4 RAID level 5 (Striping with distributed parity)
- Groups n disks as one large virtual disk with a capacity of (n-1) disks.
- Redundant information (parity) is alternately stored on all disks.
- When a disk fails, the virtual disk still works. The data is reconstructed from the surviving disks and the parity alternately stored on the disks. You need to replace the failed disk to restore fault tolerance.
- Better read performance, but slower write performance.
2.5 RAID level 0+1 (Mirrored striped volumes)
- Stripes the data across two disks and mirrors it.
- When a disk fails, the data is read from the surviving mirror.
- Better read performance and write performance than RAID level 1 alone.
- Provides both redundancy (with mirroring) and performance (with striping).
3. Dynamic Disk Groups
- A dynamic disk group is a collection of one or more disks that behave as a single storage repository.
- You can only create dynamic volumes on dynamic disks.
- A basic disk becomes dynamic, when it joins a dynamic disk group.
- Before a dynamic disk can be reverted to a basic one, all dynamic volumes on it, must first be deleted.
- Unlike, Microsoft Disk Management Disk Groups (of which you can have only one per computer), you can have multiple SFW dynamic disk groups per computer.
4. Bring Disks online
Before you can create a Dynamic Disk group, you need to have at least one basic disk, on which you have written a signature (MBR or GPT), and that is brought online. Also, you can only add Disks which are online and has a signature, to Dynamic Disk Groups.
4.1 If you have just added disks to your system, start by bringing them online. Here I have started Veritas Enterprise Administrator on a Server where I have just added two new disks. As you can see, both disks are offline, and no signature has been written on them

4.2 Choose both newly added disks, right-click→ Online Disk
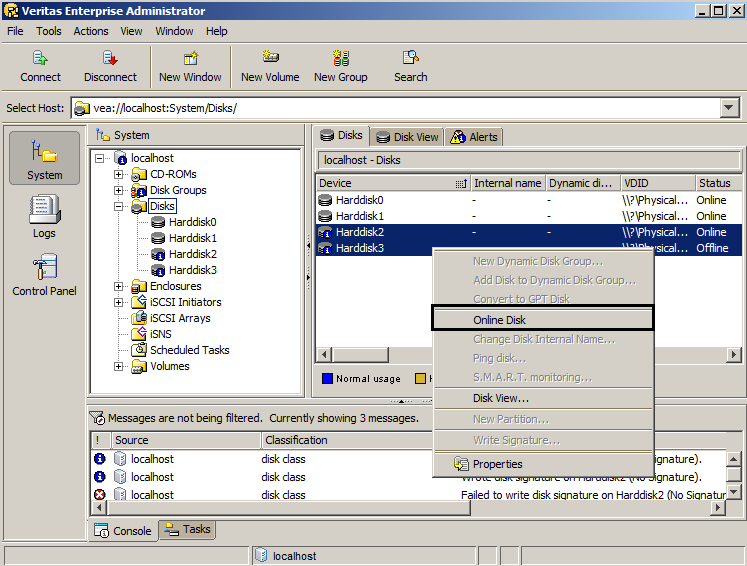
4.3 Click Yes, and the disks will be brought online

5. Write Signature on Disks
Once you have brought disks online, you can write signature on them
5.1 Right-click one of the disks, and then choose Write Signature

5.2 Choose appropriate style of signature, then click on Select All, since you only have two disks available

5.3 Both newly added disks will be selected, click OK

5.4 Click on Yes, and signature should be written on both disks

5.5 But if you get the following error, you will have to clear readonly attribute on them first

5.6 Start DiskPart

5.7 Write list disk, press enter (this will list all disks on your server, whether they are online or offline)

5.8 As you can see, Disk 2 and Disk 3 are the ones we want to clear the readonly attribute on. So first select Disk 2, then run attributes disk clear readonly. Then select Disk 3, and run attributes disk clear readonly again. Quit out of DiskPart. Now you should be able to write signature on both disks.


In Part 2 we will look at how to create Dynamic Disk Groups, and how to add Volume Manager Disk Groups as a resource in a Microsoft Failover Cluster
Pingback: Managing storage with Veritas Storage Foundation for Windows II » ShabazTech